One of my colleagues recently had a question from a customer: is it possible to have one panel in Grafana show a set of all metrics, but the other panels on a dashboard filter to a single metric value from a click in the first panel?
It's an interesting way of working with data, and something that many people find intuitive. If I have a menu of options displayed, I probably want to see only things relevant to one of those options if I click it. Unfortunately, doing that's not something that is immediately obvious in Grafana. For better or worse (and there are good reasons you might not want that behavior!) there's no automatic filtering inside of panels on a dashboard.
Usually people will use dashboard variables for this. Variables provide powerful functionality for filtering queries in Grafana. But they have a drawback: they aren't integrated directly into a dashboard, always appearing at the very top of the screen.
After playing around for a bit, it turns out that there is a way to use variables inside of a panel and have them act the same when you click a value as if you had selected that value from a dropdown at the top of the dashboard. To do this, we can slightly abuse the data links functionality provided by panels.
I'll provide an example of this using Prometheus as a data source, but it should work with any data source you like. We're going off the beaten path in Grafana here. Buckle up, because this one gets a little bumpy!
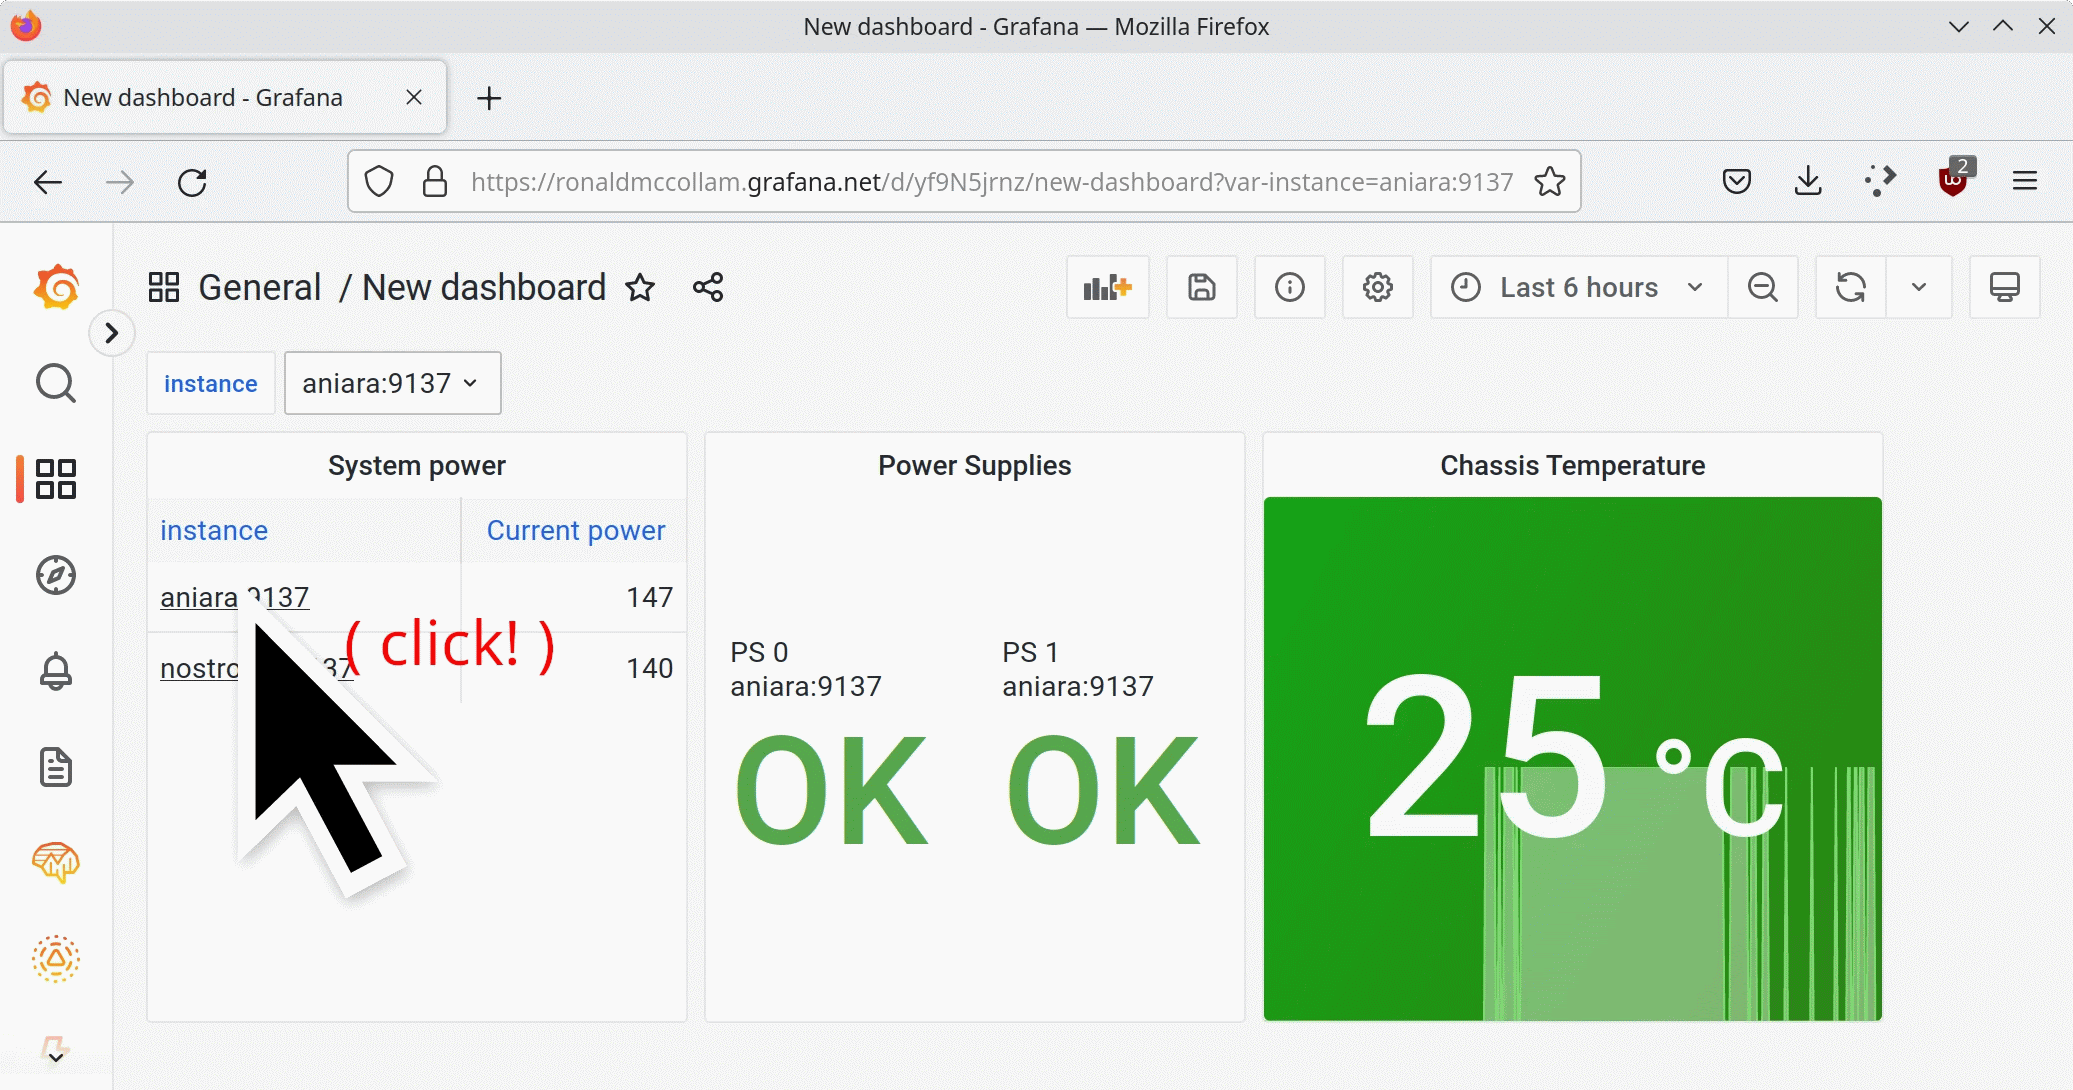
I'll walk you through the process I used to set up a simple dashboard showing hardware status of some of the servers in my home lab. I have a couple of Dell PowerEdge servers that report some useful information about the state of the hardware which I'll use as my test setup.Step 1: Setting up a variable
Even though we don't want to make people use dropdown variables at the top of the dashboard, this technique still relies on dashboard variables to work. So start by creating a query that returns all the possible values for your variable. This will be the text that gets inserted into your query when a viewer clicks on one of your in-panel links.

Give your variable a name that you'll remember, as you'll need it later.
The query and regex fields will control what data is populated in your variable. In my case, I used one of the variables that the Dell Prometheus exporter uses to report on power supply status. It doesn't really matter which metric I used, because I don't actually care about the values here. I just want a list of possible metric names, which are stored in a Prometheus label. The regex looks for a label called "instance" and grabs any value that is inside of quotation marks after that label name. So if it sees {instance="aniara:9137"} then it will grab the value aniara:9137 and add it to the list.
I added a value for "all" and set it to .* which is a wildcard value that matches anything. It's not strictly necessary but makes my dashboard work in the case where someone hasn't yet clicked a specific instance to view.
Step 2: Using the variable in a panel
The next part is straightforward if you've ever used dashboard variables: we're just going to use that variable in a panel. So I'll create panels that have the queries that I want to run, and just substitute the variable value into those queries. No surprises so far. You can see that the variable called "instance" is referenced in my Prometheus query as "$instance".

Step 3: Creating a list
Now comes the fun part. I wanted to create a panel that showed all of the possible values of my variable, but also displayed some metric as well. (After all, if I just want a list of values, I could use the variable as it stands and not worry about the rest.)
I started with a very simple query: something that would return the current power reading for each system.

This will give me a lot of extraneous data that's hard to work with. In fact, if I want to put that into a table, it's not going to work well at all! I'll have a row for each timestamp, and a separate table for each server that I'm monitoring.

We can use transformations to make this more useful. I'll start by reducing the separate sets of time series down to rows that can be shown in a table, and just grabbing the most recent value instead of the whole set. I then throw away most of the fields that are part of that data set, leaving only the instance and the actual value itself. You can see that the table goes from unreadably large to two rows, one for each server I'm monitoring.

Step 4: The magic
At this point, you must save your dashboard. The trick we're going to pull won't work until the dashboard is saved and has a unique ID.
Now that I have a nice list of servers and a useful metric in a table, the final step is to make that instance name clickable. For this, I'll use a panel override. Overrides let you change the behavior of some part of a panel, overriding the settings you've configured for the rest of it.
I start by adding an override in the panel options, then selecting the specific field I want to change. I'll select the instance field, as that's the field in my table that I want to make clickable.

To specify what the override will actually do, I add an override property and find the "data links" option.

Copy the URL up to and including the question mark character, and paste it in as the URL in your data link.
Then type var-yourvariable (being sure to replace yourvariable with the actual name of your variable) and an equals sign. Grafana will helpfully pop up a list of possible values to complete the variable.

Be sure to save your dashboard again here so your changes don't get lost when you're testing!
When you're finished, clicking the instance name in the panel will update your variable in the dashboard. You can even hide that variable in the dashboard settings and it will still work!
The drawback
There is one drawback to this technique: you can only use it to manage a single variable. There's no easy way to perform multiple filters, and if you have other variables in your dashboard, their values will be erased when someone clicks here.
Still, it can be a useful technique to make interactive dashboards!
No comments:
Post a Comment